做网站怎么开发客户站长工具无忧
目录
- 说明
- 需求
- Client
- Server
- 写法总结
- 实现
- 运行
说明
Netty 的一个练习,使用 Netty 连通 服务端 和 客户端,进行基本的通信。
需求
Client
- 连接服务端成功后,打印
连接成功 - 给服务端发送消息
HelloServer
Server
- 客户端连接成功后,打印
连接成功 - 读取到客户端的消息后,打印到控制台,并回复消息
HelloClient - 客户端断开后,打印
客户端断开连接
写法总结
- 对于
服务端和客户端的启动代码基本不变,可能会根据需要修改一些配置参数 业务逻辑都写在各种 Handler 里,根据规范,需要继承Netty已有的XxxHandler- 所有的
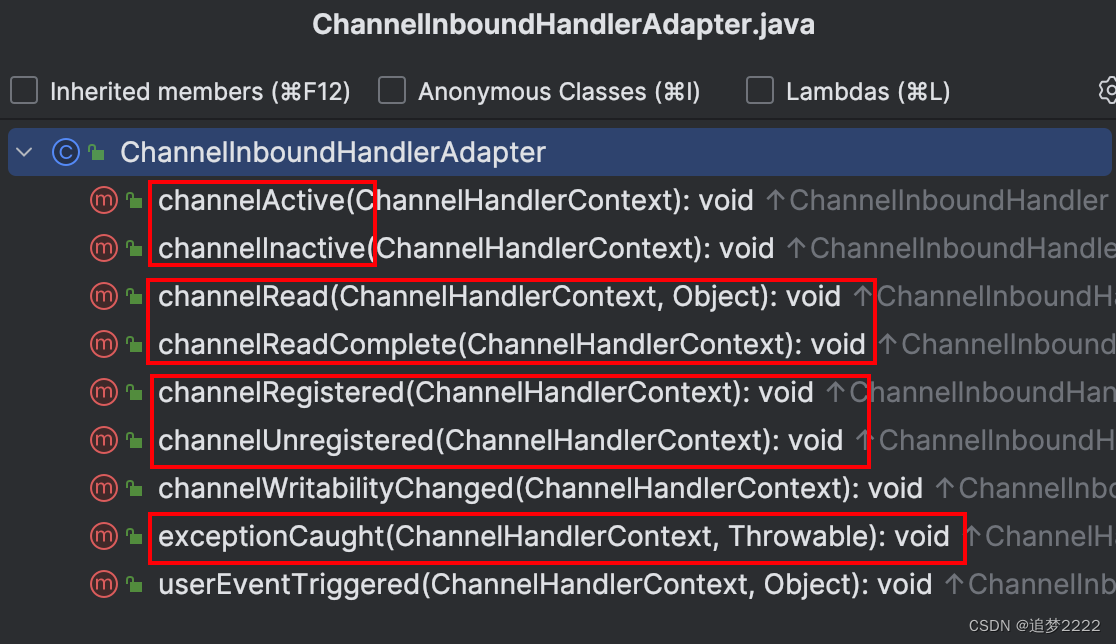
Handler都需要在socketChannel.pipeline()中以链表的形式逐个执行,细节放到原理分析 ChannelInboundHandlerAdapter中用到的方法
实现
- 导包
<dependency><groupId>io.netty</groupId><artifactId>netty-all</artifactId><version>4.1.35.Final</version></dependency>
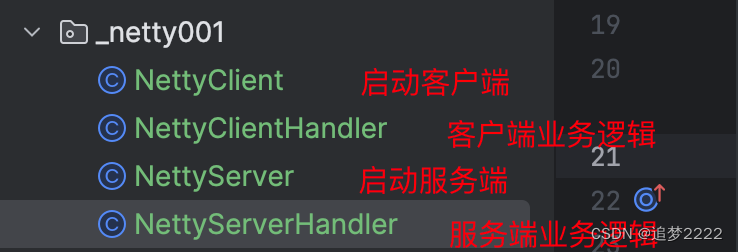
- 创建
NettyServer,用于启动服务端
import io.netty.bootstrap.ServerBootstrap;
import io.netty.channel.ChannelFuture;
import io.netty.channel.ChannelFutureListener;
import io.netty.channel.ChannelInitializer;
import io.netty.channel.nio.NioEventLoopGroup;
import io.netty.channel.socket.SocketChannel;
import io.netty.channel.socket.nio.NioServerSocketChannel;public class NettyServer {public static void main(String[] args) throws Exception {// 创建 boss 线程组,处理 连接请求,个数代表有 几主,每个 主 都需要配置一个单独的监听端口NioEventLoopGroup bossGroup = new NioEventLoopGroup(1);// 创建 worker 线程组,处理 具体业务,个数代表有NioEventLoopGroup workerGroup = new NioEventLoopGroup();try {ServerBootstrap serverBootstrap = new ServerBootstrap();// 创建 Server 启动器,配置必要参数:bossGroup, workerGroup, channel, handlerserverBootstrap.group(bossGroup, workerGroup).channel(NioServerSocketChannel.class).childHandler(new ChannelInitializer<SocketChannel>() {@Overrideprotected void initChannel(SocketChannel socketChannel) throws Exception {// 对workerGroup的SocketChannel设置 个性化业务HandlersocketChannel.pipeline().addLast(new NettyServerHandler());}});System.out.println("Netty Server start ...");ChannelFuture channelFuture = serverBootstrap.bind(9000).sync();// 给 channelFuture 添加监听器,监听是否启动成功/*channelFuture.addListener(new ChannelFutureListener() {@Overridepublic void operationComplete(ChannelFuture channelFuture) throws Exception {if (channelFuture.isSuccess()) {System.out.println("启动成功");} else {System.out.println("启动失败");}}});*/channelFuture.channel().closeFuture().sync();} finally {bossGroup.shutdownGracefully();workerGroup.shutdownGracefully();}}
}
- 创建
NettyServerHandler,实现具体业务
import io.netty.buffer.ByteBuf;
import io.netty.buffer.Unpooled;
import io.netty.channel.ChannelHandlerContext;
import io.netty.channel.ChannelInboundHandlerAdapter;
import io.netty.util.CharsetUtil;/*** 自定义Handler需要继承netty规定好的某个HandlerAdapter (规范)*      业务逻辑:*          连接成功后,打印 连接成功*          收到客户端的消息时,打印,并回复消息** @author liuhuan*/
public class NettyServerHandler extends ChannelInboundHandlerAdapter {// 当客户端连接服务器完成就会触发该方法@Overridepublic void channelActive(ChannelHandlerContext ctx) throws Exception {System.out.println("客户端建立连接成功");}@Overridepublic void channelInactive(ChannelHandlerContext ctx) throws Exception {System.out.println("客户端断开连接");}// 读取客户端发送的数据@Overridepublic void channelRead(ChannelHandlerContext ctx, Object msg) throws Exception {ByteBuf byteBuf = (ByteBuf) msg;System.out.println("收到客户端的消息是:" + byteBuf.toString(CharsetUtil.UTF_8));}// 数据读取完毕时触发该方法@Overridepublic void channelReadComplete(ChannelHandlerContext ctx) throws Exception {ByteBuf buf = Unpooled.copiedBuffer("HelloClient".getBytes(CharsetUtil.UTF_8));ctx.writeAndFlush(buf);}// 处理异常, 一般是需要关闭通道@Overridepublic void exceptionCaught(ChannelHandlerContext ctx, Throwable cause) throws Exception {cause.printStackTrace();ctx.close();}
}
- 创建
NettyClient,启动客户端
import io.netty.bootstrap.Bootstrap;
import io.netty.channel.ChannelFuture;
import io.netty.channel.ChannelInitializer;
import io.netty.channel.nio.NioEventLoopGroup;
import io.netty.channel.socket.SocketChannel;
import io.netty.channel.socket.nio.NioSocketChannel;public class NettyClient {public static void main(String[] args) throws InterruptedException {NioEventLoopGroup group = new NioEventLoopGroup();try {Bootstrap bootstrap = new Bootstrap();// 创建 客户端启动器,配置必要参数bootstrap.group(group).channel(NioSocketChannel.class).handler(new ChannelInitializer<SocketChannel>() {@Overrideprotected void initChannel(SocketChannel ch) throws Exception {ch.pipeline().addLast(new NettyClientHandler());}});System.out.println("Netty Client start ...");ChannelFuture channelFuture = bootstrap.connect("127.0.0.1", 9000).sync();channelFuture.channel().closeFuture().sync();} finally {group.shutdownGracefully();}}
}
- 创建
NettyClientHandler,实现客户端业务逻辑
import io.netty.buffer.ByteBuf;
import io.netty.buffer.Unpooled;
import io.netty.channel.ChannelHandlerContext;
import io.netty.channel.ChannelInboundHandlerAdapter;
import io.netty.util.CharsetUtil;/*** 自定义Handler需要继承netty规定好的某个HandlerAdapter (规范)*      业务逻辑:连接成功后,给服务端发送一条消息** @author liuhuan*/
public class NettyClientHandler extends ChannelInboundHandlerAdapter {// 当客户端连接服务器完成就会触发该方法@Overridepublic void channelActive(ChannelHandlerContext ctx) {System.out.println("连接建立成功");ByteBuf buf = Unpooled.copiedBuffer("HelloServer".getBytes(CharsetUtil.UTF_8));ctx.writeAndFlush(buf);}//当通道有读取事件时会触发,即服务端发送数据给客户端@Overridepublic void channelRead(ChannelHandlerContext ctx, Object msg) {ByteBuf buf = (ByteBuf) msg;System.out.println("收到服务端的消息:" + buf.toString(CharsetUtil.UTF_8));}@Overridepublic void exceptionCaught(ChannelHandlerContext ctx, Throwable cause) {cause.printStackTrace();ctx.close();}
}
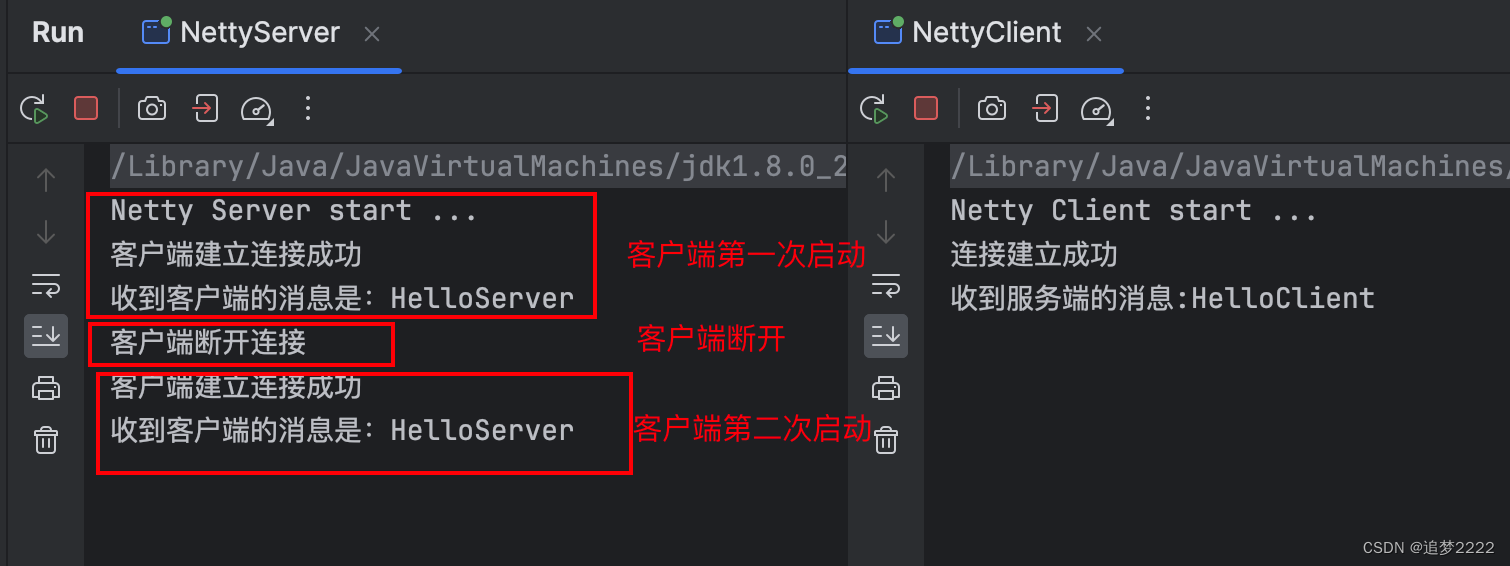
运行
- 先执行
NettyServer的main方法,启动服务端,查看日志 - 执行
NettyClient的main方法,启动客户端,查看日志 - 关闭
NettyClient服务,查看日志 - 重新执行
NettyClient的main方法,启动客户端,查看日志