为什么WORDPRESS后台很卡seo教程自学网
k8s部署安装
- 一 K8s集群环境搭建
- 1.1 k8s中容器的管理方式
- 1.2 k8s集群部署
- 1.2.1 k8s环境部署说明
- 1.2.2 k8s集群环境初始化
- 1.2.2.1 所有节点禁用swap和本地解析
- 1.2.2.2 所有节点安装docker
- 1.2.2.3.所有节点设定docker的资源管理模式为systemd
- 1.2.2.4.所有阶段复制harbor仓库中的证书并启动docker
- 1.2.2.5 安装K8S部署工具
- 1.2.2.6 设置kubectl命令补齐功能
- 1.2.2.7 在所节点安装cri-docker
- 1.2.2.8 在master节点拉取K8S所需镜像
- 1.2.2.9 集群初始化
- 1.2.2.10 安装flannel网络插件
- 1.2.2.11 节点扩容
一 K8s集群环境搭建
1.1 k8s中容器的管理方式
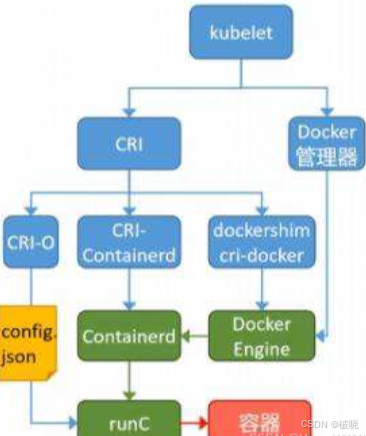
K8S 集群创建方式有3种:
- centainerd
默认情况下,K8S在创建集群时使用的方式 - docker
Docker使用的普记录最高,虽然K8S在1.24版本后已经费力了kubelet对docker的支持,但时可以借助cri-docker方式来实现集群创建 - cri-o
CRI-O的方式是Kubernetes创建容器最直接的一种方式,在创建集群的时候,需要借助于cri-o插件的方式来实现Kubernetes集群的创建。
Note:docker 和cri-o 这两种方式要对kubelet程序的启动参数进行设置
1.2 k8s集群部署
1.2.1 k8s环境部署说明
环境准备:
| 主机 | 角色 | IP |
|---|---|---|
| master 集群控制节点 | master 集群控制节点 | 172.25.250.100 |
| k8s-node1.exam.com | worker 工作节点 | 172.25.250.10 |
| k8s-node2.exam.com | worker 工作节点 | 172.25.250.20 |
| reg.exam.com | harbor镜像仓库 | 172.25.250.250 |
| 所有节点禁用selinux和防火墙 |
-
所有节点同步时间和解析
-
所有节点安装docker-ce
-
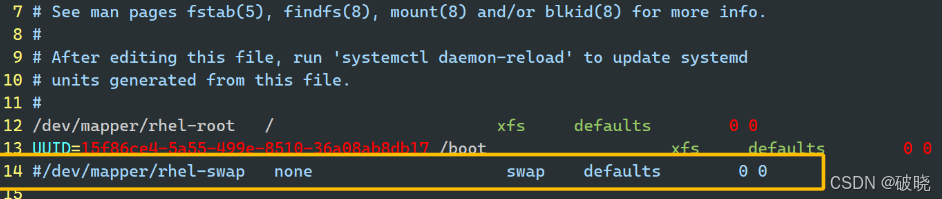
所有节点禁用swap,注意注释掉/etc/fstab文件中的定义
1.2.2 k8s集群环境初始化
所有k8s集群节点执行以下步骤
1.2.2.1 所有节点禁用swap和本地解析
[root@k8s-master ~]# systemctl list-unit-files | grep swap#关闭系统中所有的交换空间
[root@k8s-master ~]# swapoff -a
[root@k8s-master ~]# vim /etc/fstab
#
# /etc/fstab
# Created by anaconda on Sun Feb 19 17:38:40 2023
#
# Accessible filesystems, by reference, are maintained under '/dev/disk'
# See man pages fstab(5), findfs(8), mount(8) and/or blkid(8) for more info
#
/dev/mapper/rhel-root   /                       xfs     defaults        0 0
UUID=ddb06c77-c9da-4e92-afd7-53cd76e6a94a /boot                   xfs     defaults        0 0
#/dev/mapper/rhel-swap   swap
本地解析
[root@k8s-master ~]# vim /etc/hosts
172.25.250.100  k8s-master.exam.com
172.25.250.10   k8s-node1.exam.com
172.25.250.20   k8s-node2.exam.com
172.25.250.250  reg.exam.com
1.2.2.2 所有节点安装docker
[root@k8s-master ~]# vim /etc/yum.repos.d/docker.repo
[docker]
name=docker
baseurl=https://mirrors.aliyun.com/docker-ce/linux/rhel/9/x86_64/stable/
gpgcheck=0[root@k8s-master ~]# dnf install docker-ce -y
1.2.2.3.所有节点设定docker的资源管理模式为systemd
[root@k8s-master ~]# vim /etc/docker/daemon.json
{"registry-mirrors": ["https://reg.westos.org"],"exec-opts": ["native.cgroupdriver=systemd"],"log-driver": "json-file","log-opts": {"max-size": "100m"},"storage-driver": "overlay2"
}
1.2.2.4.所有阶段复制harbor仓库中的证书并启动docker
[root@k8s-master ~]# ls -l /etc/docker/certs.d/reg.exam.com/ca.crt
[root@k8s-master ~]# systemctl enable --now docker#登陆harbor仓库
[root@k8s-master ~]# docker login reg.exam.com
[root@k8s-master ~]# docker info
Client: Docker Engine - CommunityVersion:    27.1.2Context:    defaultDebug Mode: falsePlugins:buildx: Docker Buildx (Docker Inc.)Version:  v0.16.2Path:     /usr/libexec/docker/cli-plugins/docker-buildxcompose: Docker Compose (Docker Inc.)Version:  v2.29.1Path:     /usr/libexec/docker/cli-plugins/docker-composeServer:Containers: 0Running: 0Paused: 0Stopped: 0Images: 0Server Version: 27.1.2Storage Driver: overlay2Backing Filesystem: xfsSupports d_type: trueUsing metacopy: falseNative Overlay Diff: trueuserxattr: falseLogging Driver: json-fileCgroup Driver: systemd			#资源管理更改为systemdCgroup Version: 2Plugins:Volume: localNetwork: bridge host ipvlan macvlan null overlayLog: awslogs fluentd gcplogs gelf journald json-file local splunk syslogSwarm: inactiveRuntimes: io.containerd.runc.v2 runcDefault Runtime: runcInit Binary: docker-initcontainerd version: 8fc6bcff51318944179630522a095cc9dbf9f353runc version: v1.1.13-0-g58aa920init version: de40ad0Security Options:seccompProfile: builtincgroupnsKernel Version: 5.14.0-427.13.1.el9_4.x86_64Operating System: Red Hat Enterprise Linux 9.4 (Plow)OSType: linuxArchitecture: x86_64CPUs: 1Total Memory: 736.3MiBName: k8s-master.exam.comID: f3c291bf-287d-4cf6-8e69-5f21c79fa7c6Docker Root Dir: /var/lib/dockerDebug Mode: falseExperimental: falseInsecure Registries:127.0.0.0/8Registry Mirrors:https://reg.exam.com/			#认证harbor仓库Live Restore Enabled: false
1.2.2.5 安装K8S部署工具
#部署harbor软件仓库,添加k8s源
[root@k8s-master ~]# vim /etc/yum.repos.d/k8s.repo
[k8s]
name=k8s
baseurl=https://mirrors.aliyun.com/kubernetes-new/core/stable/v1.30/rpm
gpgcheck=0#检测网络是否连通#安装软件
[root@k8s-master ~]# dnf install kubelet-1.30.0-150500.1.1 kubeadm-1.30.0-150500.1.1 kubectl-1.30.0-150500.1.1 --downloadonly --downloaddir=/mnt -y[root@k8s-master mnt]# dnf install *.rpm -y
1.2.2.6 设置kubectl命令补齐功能
[root@k8s-master ~]# dnf install bash-completion -y
[root@k8s-master ~]# echo "source <(kubectl completion bash)" >> ~/.bashrc
[root@k8s-master ~]# source ~/.bashrc
1.2.2.7 在所节点安装cri-docker
安装cri-docker插件
[root@k8s-master ~]# dnf install libcgroup-0.41-19.el8.x86_64.rpm cri-dockerd-0.3.14-3.el8.x86_64.rpm -y[root@k8s-master ~]# vim /lib/systemd/system/cri-docker.service
[Unit]
Description=CRI Interface for Docker Application Container Engine
Documentation=https://docs.mirantis.com
After=network-online.target firewalld.service docker.service
Wants=network-online.target
Requires=cri-docker.socket[Service]
Type=notify
指定网络插件名称及基础容器镜像
[root@k8s-master ~]# vim /lib/systemd/system/cri-docker.service
#指定网络插件名称及基础容器镜像
...
ExecStart=/usr/bin/cri-dockerd --container-runtime-endpoint fd:// --network-plugin=cni --pod-infra-container-image=reg.exam.com/k8s/pause:3.9
...
--network-plugin=cni --pod-infra-container-image=reg.timinglee.org/k8s/pause:3.9[root@k8s-master ~]# systemctl daemon-reload
[root@k8s-master ~]# systemctl start cri-docker
[root@k8s-master ~]# ll /var/run/cri-dockerd.sock
srw-rw---- 1 root docker 0  8月 26 22:14 /var/run/cri-dockerd.sock		#cri-dockerd的套接字文件
1.2.2.8 在master节点拉取K8S所需镜像
[root@k8s-master ~]# kubeadm config images pull \
--image-repository registry.aliyuncs.com/google_containers \
--kubernetes-version v1.30.0 \
--cri-socket=unix:///var/run/cri-dockerd.sock
上传镜像到harbor仓库
[root@k8s-master ~]# docker images | awk '/google/{ print $1":"$2}' \
| awk -F "/" '{system("docker tag "$0" reg.exam.com/k8s/"$3)}'[root@k8s-master ~]# docker images  | awk '/k8s/{system("docker push "$1":"$2)}'
1.2.2.9 集群初始化
#启动kubelet服务
[root@k8s-master ~]# systemctl status kubelet.service
[root@k8s-master docker]# systemctl start kubelet.service #执行初始化命令
[root@k8s-master ~]# kubeadm init --pod-network-cidr=10.244.0.0/16 \
--image-repository=reg.exam.com/k8s \
--kubernetes-version v1.30.0 \
--cri-socket=unix:///var/run/cri-dockerd.sockkubeadm init --pod-network-cidr=10.244.0.0/16 --image-repository=reg.exam.com/k8s --kubernetes-version v1.30.0 --cri-socket=unix:///var/run/cri-dockerd.sock#初始化报错 重新初始化
一定注意IP使用默认10.244.0.0
kubeadm reset --cri-socket=unix:///var/run/cri-dockerd.sock--------------------------------------------------
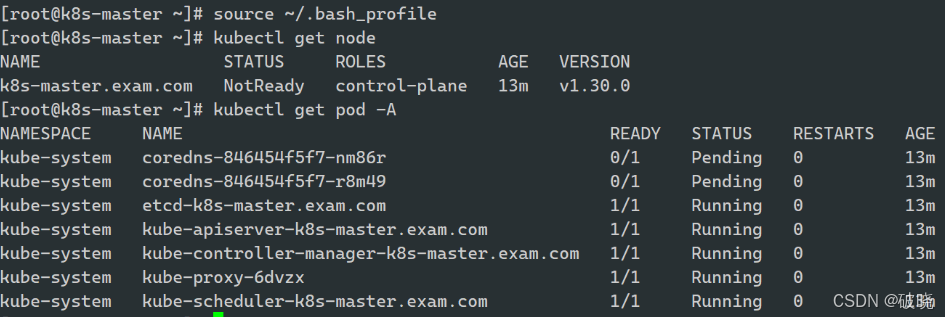
#指定集群配置文件变量
[root@k8s-master ~]# echo "export KUBECONFIG=/etc/kubernetes/admin.conf" >> ~/.bash_profile
[root@k8s-master ~]# source ~/.bash_profile#当前节点没有就绪,因为还没有安装网络插件,容器没有运行
[root@k8s-master ~]# kubectl get nodes
[root@k8s-master ~]# kubectl get pod -A
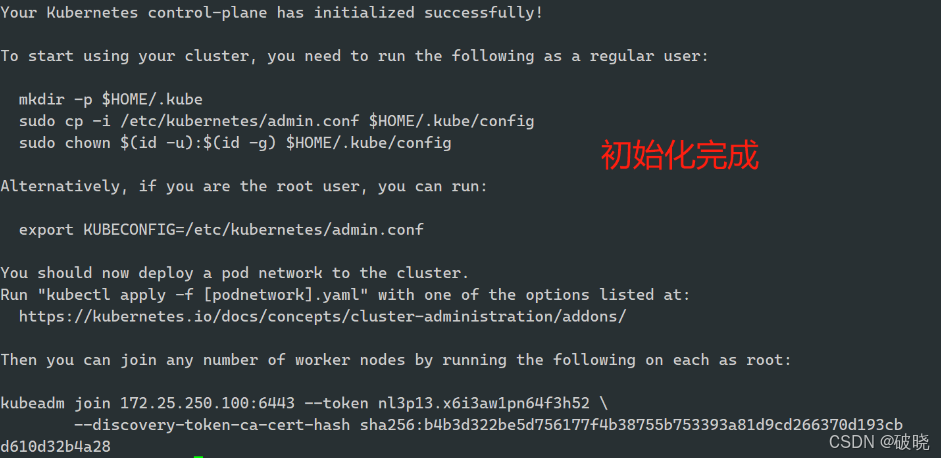
Note:在此阶段如果生成的集群token找不到了可以重新生成
[root@k8s-master ~]#   kubeadm token create --print-join-command
kubeadm join 172.25.250.100:6443 --token 5hwptm.zwn7epa6pvatbpwf --discovery-token-ca-cert-hash sha256:52f1a83b70ffc8744db5570288ab51987ef2b563bf906ba4244a300f61e9db23
1.2.2.10 安装flannel网络插件
#下载flannel的yaml部署文件
[root@k8s-master ~]# wget https://github.com/flannel-io/flannel/releases/latest/download/kube-flannel.yml[root@k8s-master ~]# curl -L -o kube-flannel.yml https://github.com/flannel-io/flannel/releases/latest/download/kube-flannel.yml#下载镜像:
[root@k8s-master ~]# docker pull docker.io/flannel/flannel:v0.25.5[root@k8s-master ~]# docker pull docker.io/flannel/flannel-cni-plugin:v1.5.1-flannel1##新建仓库并上传到仓库
[root@k8s-master ~]# docker tag flannel/flannel:v0.25.5 \
reg.exam.com/flannel/flannel:v0.25.5[root@k8s-master ~]# docker push reg.exam.com/flannel/flannel:v0.25.5[root@k8s-master ~]# docker tag flannel/flannel-cni-plugin:v1.5.1-flannel1 \
reg.exam.com/flannel/flannel-cni-plugin:v1.5.1-flannel1[root@k8s-master ~]# docker push reg.exam.com/flannel/flannel-cni-plugin:v1.5.1-flannel1#编辑kube-flannel.yml 修改镜像下载位置
[root@k8s-master ~]# vim kube-flannel.yml#需要修改以下几行
[root@k8s-master ~]# grep -n image kube-flannel.yml
146:        image: flannel/flannel:v0.25.5
173:        image: flannel/flannel-cni-plugin:v1.5.1-flannel1
184:        image: flannel/flannel:v0.25.5#安装flannel网络插件
[root@k8s-master ~]# kubectl apply -f kube-flannel.yml
1.2.2.11 节点扩容
在所有的worker节点中
1 确认部署好以下内容
2 禁用swap
3 安装:
kubelet-1.30.0
kubeadm-1.30.0
kubectl-1.30.0
docker-ce
cri-dockerd
4 修改cri-dockerd启动文件添加
–network-plugin=cni
–pod-infra-container-image=reg.timinglee.org/k8s/pause:3.9
5 启动服务
kubelet.service
cri-docker.service
复制master生成的token 再加上插件参数
[root@k8s-node1 & 2  ~]# kubeadm join 172.25.250.100:6443 --token pvtgvf.dgrw07jzfyykyxwr --discovery-token-ca-cert-hash sha256:b4b3d322be5d756177f4b38755b753393a81d9cd266370d193cbd610d32b4a28 --cri-socket=unix:///var/run/cri-dockerd.sock
可能会遇到插件问题
[root@k8s-master ~]# kubectl get pods --all-namespaces
NAMESPACE NAME READY STATUS RESTARTS AGE
kube-flannel kube-flannel-ds-4dkn8 0/1 Init:ImagePullBackOff 0 9m29s
kube-flannel kube-flannel-ds-6bg6b 0/1 Init:ImagePullBackOff 0 54m
kube-flannel kube-flannel-ds-xbjlk 0/1 Init:ImagePullBackOff 0 9m29s重新初始化
[root@k8s-master ~]# kubeadm reset --cri-socket=unix:///var/run/cri-dockerd.sock kubeadm init --pod-network-cidr=10.244.0.0/16 --image-repository reg.exam.com/k8s --kubernetes-version v1.30.0 --cri-socket=unix:///var/run/cri-dockerd.sock[root@k8s-master ~]# vim kube-flannel.yml
146: image: flannel/flannel:v0.25.5
173: image: flannel/flannel-cni-plugin:v1.5.1-flannel1
184: image: flannel/flannel:v0.25.5[root@k8s-master ~]# kubectl apply -f kube-flannel.yml [root@k8s-master ~]# kubectl get nodes
NAME STATUS ROLES AGE VERSION
k8s-master.exam.com Ready control-plane 38s v1.30.0#重新初始化
[root@k8s-node1,2 ~]# kubeadm reset --cri-socket=unix:///var/run/cri-dockerd.sock kubeadm join 172.25.250.100:6443 --token 8mstsi.kvb94ivl2pivcjvr \--discovery-token-ca-cert-hash sha256:1ccb1ee51389bdcff6356a6bacf982578b41cc023689a03b7cf69424e2929557 --cri-socket=unix:///var/run/cri-dockerd.sock[root@k8s-master ~]# kubectl -n kube-flannel get pods

ready就是准备好了
测试
#建立一个pod
[root@k8s-master ~]# kubectl run test --image nginx#查看pod状态
[root@k8s-master ~]# kubectl get pods
NAME   READY   STATUS    RESTARTS   AGE
test   1/1     Running   0          6m29s#删除pod
[root@k8s-master ~]# kubectl delete pod test
pod "test" deleted