美国十大购物网站网站seo方案撰写
基于WIN10的64位系统演示
一、写在前面
类激活映射(Class Activation Mapping,CAM)和梯度权重类激活映射(Gradient-weighted Class Activation Mapping,Grad-CAM)是两种可视化深度学习模型决策过程的技术。他们都是为了理解模型的决策过程,特别是对于图像分类任务,它们可以生成一种热力图,这种图可以突出显示模型在做出预测时关注的图像区域。
CAM:CAM是一种可视化卷积神经网络(Convolutional Neural Networks, CNN)决策依据的技术。对于图像分类任务,它可以生成一种热力图,突出显示模型在做出预测时关注的图像区域。CAM需要模型在全局平均池化(Global Average Pooling, GAP)层和最终的全连接层(Fully Connected, FC)之间没有其他隐藏层,这是其使用的限制。
Grad-CAM:Grad-CAM是为了克服CAM的限制而提出的一种方法,它使用的是类别得分关于特定层输出的梯度信息。这种方法不仅可以应用于卷积层,还可以应用于任何层的输出。因此,Grad-CAM可以用于多种类型的深度学习模型,包括图像分类、图像生成、强化学习等各种模型。这使得Grad-CAM在可视化模型决策过程方面更加灵活和强大。
这一期主要介绍Grad-CAM,用的模型是Mobilenet_v2,以为够快!!
二、Grad-CAM可视化实战
继续使用胸片的数据集:肺结核病人和健康人的胸片的识别。其中,肺结核病人700张,健康人900张,分别存入单独的文件夹中。
(a)Mobilenet_v2建模
######################################导入包###################################
from tensorflow import keras
import tensorflow as tf
from tensorflow.python.keras.layers import Dense, Flatten, Conv2D, MaxPool2D, Dropout, Activation, Reshape, Softmax, GlobalAveragePooling2D, BatchNormalization
from tensorflow.python.keras.layers.convolutional import Convolution2D, MaxPooling2D
from tensorflow.python.keras import Sequential
from tensorflow.python.keras import Model
from tensorflow.python.keras.optimizers import adam_v2
import numpy as np
import matplotlib.pyplot as plt
from tensorflow.python.keras.preprocessing.image import ImageDataGenerator, image_dataset_from_directory
from tensorflow.python.keras.layers.preprocessing.image_preprocessing import RandomFlip, RandomRotation, RandomContrast, RandomZoom, RandomTranslation
import os,PIL,pathlib
import warnings
#设置GPU
gpus = tf.config.list_physical_devices("GPU")if gpus:gpu0 = gpus[0] #如果有多个GPU,仅使用第0个GPUtf.config.experimental.set_memory_growth(gpu0, True) #设置GPU显存用量按需使用tf.config.set_visible_devices([gpu0],"GPU")warnings.filterwarnings("ignore")             #忽略警告信息
plt.rcParams['font.sans-serif'] = ['SimHei']  # 用来正常显示中文标签
plt.rcParams['axes.unicode_minus'] = False    # 用来正常显示负号################################导入数据集#####################################
#1.导入数据
data_dir = "./MTB"
data_dir = pathlib.Path(data_dir)
image_count = len(list(data_dir.glob('*/*')))
print("图片总数为:",image_count)batch_size = 32
img_height = 100
img_width  = 100train_ds = image_dataset_from_directory(data_dir,validation_split=0.2,subset="training",seed=12,image_size=(img_height, img_width),batch_size=batch_size)val_ds = image_dataset_from_directory(data_dir,validation_split=0.2,subset="validation",seed=12,image_size=(img_height, img_width),batch_size=batch_size)class_names = train_ds.class_names
print(class_names)
print(train_ds)#2.检查数据
for image_batch, labels_batch in train_ds:print(image_batch.shape)print(labels_batch.shape)break#3.配置数据
AUTOTUNE = tf.data.AUTOTUNEdef train_preprocessing(image,label):return (image/255.0,label)train_ds = (train_ds.cache().shuffle(800).map(train_preprocessing)    .prefetch(buffer_size=AUTOTUNE)
)val_ds = (val_ds.cache().map(train_preprocessing) .prefetch(buffer_size=AUTOTUNE)
)#4. 数据可视化
plt.figure(figsize=(10, 8))  # 图形的宽为10高为5
plt.suptitle("数据展示")class_names = ["Tuberculosis","Normal"]for images, labels in train_ds.take(1):for i in range(15):plt.subplot(4, 5, i + 1)plt.xticks([])plt.yticks([])plt.grid(False)# 显示图片plt.imshow(images[i])# 显示标签plt.xlabel(class_names[labels[i]-1])plt.show()######################################数据增强函数################################data_augmentation = Sequential([RandomFlip("horizontal_and_vertical"),RandomRotation(0.2),RandomContrast(1.0),RandomZoom(0.5,0.2),RandomTranslation(0.3,0.5),
])def prepare(ds):ds = ds.map(lambda x, y: (data_augmentation(x, training=True), y), num_parallel_calls=AUTOTUNE)return ds
train_ds = prepare(train_ds)################################导入mobilenet_v2################################
#获取预训练模型对输入的预处理方法
from tensorflow.python.keras.applications import mobilenet_v2
from tensorflow.python.keras import Input, regularizers
IMG_SIZE = (img_height, img_width, 3)# 创建输入张量
inputs = Input(shape=IMG_SIZE)
# 定义基础模型,并将 inputs 传入
base_model = mobilenet_v2.MobileNetV2(input_tensor=inputs,include_top=False, weights='imagenet')#从基础模型中获取输出
x = base_model.output
#全局池化
x = GlobalAveragePooling2D()(x)
#BatchNormalization
x = BatchNormalization()(x)
#Dropout
x = Dropout(0.8)(x)
#Dense
x = Dense(128, kernel_regularizer=regularizers.l2(0.1))(x)  # 全连接层减少到128,添加 L2 正则化
#BatchNormalization
x = BatchNormalization()(x)
#激活函数
x = Activation('relu')(x)
#输出层
outputs = Dense(2, kernel_regularizer=regularizers.l2(0.1))(x)  # 添加 L2 正则化
#BatchNormalization
outputs = BatchNormalization()(outputs)
#激活函数
outputs = Activation('sigmoid')(outputs)
#整体封装
model = Model(inputs, outputs)
#打印模型结构
print(model.summary())#############################编译模型#########################################
#定义优化器
from tensorflow.python.keras.optimizers import adam_v2, rmsprop_v2
optimizer = adam_v2.Adam()#编译模型
model.compile(optimizer=optimizer,loss='sparse_categorical_crossentropy',metrics=['accuracy'])#训练模型
from tensorflow.python.keras.callbacks import ModelCheckpoint, Callback, EarlyStopping, ReduceLROnPlateau, LearningRateSchedulerNO_EPOCHS = 50
PATIENCE  = 10
VERBOSE   = 1# 设置动态学习率
annealer = LearningRateScheduler(lambda x: 1e-5 * 0.99 ** (x+NO_EPOCHS))# 设置早停
earlystopper = EarlyStopping(monitor='loss', patience=PATIENCE, verbose=VERBOSE)#
checkpointer = ModelCheckpoint('mtb_jet_best_model_mobilenetv3samll.h5',monitor='val_accuracy',verbose=VERBOSE,save_best_only=True,save_weights_only=True)train_model  = model.fit(train_ds,epochs=NO_EPOCHS,verbose=1,validation_data=val_ds,callbacks=[earlystopper, checkpointer, annealer])#保存模型
model.save('mtb_jet_best_model_mobilenet.h5')
print("The trained model has been saved.")
(b)Grad-CAM
import numpy as np
from PIL import Image, ImageOps
from tensorflow.python.keras.preprocessing import image
from tensorflow.python.keras.applications.mobilenet_v2 import preprocess_input
from tensorflow.python.keras.models import load_model
import tensorflow as tf
from tensorflow.python.keras import Model
import matplotlib.pyplot as plt# 你的模型路径
model_path = 'mtb_jet_best_model_mobilenet.h5'# 你的图像路径
image_path = './MTB/Tuberculosis/Tuberculosis-666.png'# 加载你的模型
model = load_model(model_path)def grad_cam(img_path, cls, model, layer_name='block_7_project'):# 加载图像并预处理img = image.load_img(img_path, target_size=(100, 100))x = image.img_to_array(img)x = np.expand_dims(x, axis=0)x = preprocess_input(x)# 获取预测类别preds = model.predict(x)pred_class = np.argmax(preds[0])# 使用 GradientTape 计算 Grad-CAMwith tf.GradientTape() as tape:last_conv_layer = model.get_layer(layer_name)iterate = Model([model.inputs], [model.output, last_conv_layer.output])model_out, last_conv_layer = iterate(x)class_out = model_out[:, pred_class]# 得到的梯度grads = tape.gradient(class_out, last_conv_layer)pooled_grads = tf.reduce_mean(grads, axis=(0, 1, 2))# 我们把梯度在每个特征图上进行平均heatmap = tf.reduce_mean(tf.multiply(pooled_grads, last_conv_layer), axis=-1)# 调整 heatmap 的形状和数值范围heatmap = tf.squeeze(heatmap)  # 去掉尺寸为1的维度heatmap = np.maximum(heatmap, 0)  # 去掉小于0的值max_heat = np.max(heatmap)if max_heat == 0:max_heat = 1e-10  # 防止除以0heatmap /= max_heat  # 归一化到0-1之间heatmap = np.uint8(255 * heatmap)  # 转换到0-255之间并转为uint8类型# 加载原始图像img = Image.open(img_path)# 将热力图转换为 PIL 图像并调整其尺寸heatmap = Image.fromarray(heatmap)heatmap = heatmap.resize((img.height, img.width))# 将单通道热力图转换为彩色(RGB)图像heatmap = ImageOps.colorize(heatmap, 'blue', 'red')# 将彩色热力图转换为带透明度的(RGBA)图像heatmap = heatmap.convert('RGBA')heatmap_with_alpha = Image.new('RGBA', heatmap.size)for x in range(heatmap.width):for y in range(heatmap.height):r, g, b, a = heatmap.getpixel((x, y))heatmap_with_alpha.putpixel((x, y), (r, g, b, int(a * 0.5)))# 将原始图像转换为 RGBA 图像img = img.convert('RGBA')# 叠加图像overlay = Image.alpha_composite(img, heatmap_with_alpha)# 将叠加后的图像转换为numpy数组overlay = np.array(overlay)# 使用matplotlib显示图像plt.imshow(overlay)plt.axis('off')  # 不显示坐标轴plt.show()print(pred_class)# 绘制热力图
grad_cam(image_path, 0, model)
这个代码需要调整的参数就只有“layer_name”,也就是使用哪一层的信息来可视化。当然,首先我们得先知道每一层的名称:
#查看 Keras 模型每一层的名称
for layer in model.layers:print(layer.name)
输出如下:
然后,用哪一层呢?
其实吧,选择哪一层用于Grad-CAM的计算并没有一条明确的规则,这完全取决于你的模型结构以及你的具体需求。
一般来说,Convolutional Neural Networks(CNN,卷积神经网络)的前面几层往往捕捉到的是图像的低级特征,比如边缘、色彩和纹理等,而后面的层则可以捕捉到更为高级的特征,比如物体的部分或者整体。所以,如果你想要看到模型在判断图像时,主要关注了图像中的哪些部分或者物体,你可能需要选择离输出层更近一些的卷积层。
但是这也不是绝对的。在实际应用中,你可能需要尝试不同的层,看看哪一层生成的Grad-CAM热力图最能满足你的需求。
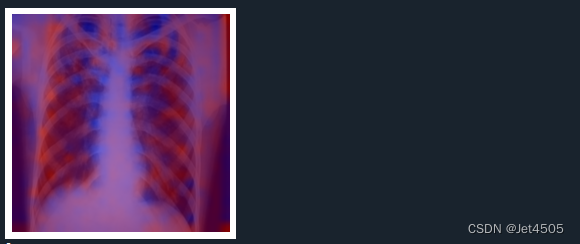
比如我试了试:'block_1_project':
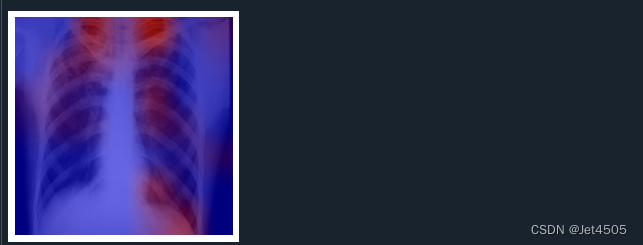
'block_7_project':
'block_10_project':

'block_2_add':
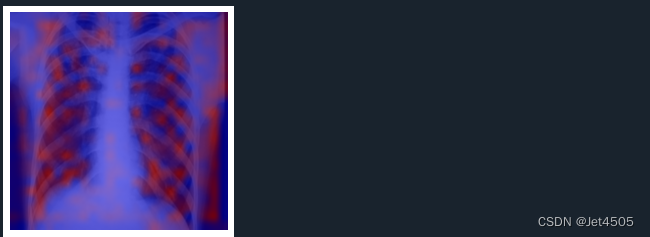
综上,似乎一切随缘,太抽象了!!!
三、写在最后
略~
四、数据
链接:https://pan.baidu.com/s/15vSVhz1rQBtqNkNp2GQyVw?pwd=x3jf
提取码:x3jf