网页设计与制作cssseo内容优化方法
一、说明
了解最先进的nnU-Net以及如何将其应用于您自己的数据集所需的一切。使用nnU-Net,这是语义图像分割中非常强大的基线。在本指南中,您将:
- 对nnU-Net的主要贡献进行简要概述。
- 了解如何将 nnU-Net 应用于您自己的数据集。
但是,我有点努力才能完全理解模型以及如何训练它,并且在互联网上找不到太多帮助。现在我已经熟悉了,我创建了本教程来帮助您更好地理解此模型背后的内容,或者如何在您自己的数据集中使用它。
二、nnU-Net简史
nnU-Net被公认为图像分割领域最先进的模型,在2D和3D图像处理方面都是一股不屈不挠的力量。它的性能非常强大,可以作为对新的计算机视觉架构进行基准测试的强大基准。从本质上讲,如果您正在冒险开发新颖的计算机视觉模型,请将nnU-Net视为您的“超越目标”。
这个强大的工具基于U-Net模型(你可以在这里找到我的教程之一:烹饪你的第一个U-Net),该模型于2015年首次亮相。名称“nnU-Net”代表“没有新的U-Net”,这是对其设计没有引入革命性建筑改动这一事实的认可。相反,它采用现有的U-Net结构,并使用一组巧妙的优化策略来充分发挥其潜力。
与许多现代神经网络相反,nnU-Net不依赖于残差连接,密集连接或注意力机制。它的优势在于其细致的优化策略,其中包括重采样、归一化、明智地选择损失函数、优化器设置、数据增强、基于补丁的推理和跨模型集成等技术。这种整体方法使nnU-Net能够突破原始U-Net架构可实现的界限。
三、探索 nnU-Net 中的各种架构
虽然它看起来像一个单一的实体,但nnU-Net实际上是三种不同类型的U-Net的总称:

2D、3D 和级联,图片来自 nnU-Net 文章
- 2D U-Net: 可以说是最著名的变体,它直接在2D图像上运行。
- 3D U-Net:这是2D U-Net的扩展,能够通过3D卷积的应用直接处理3D图像。
- U-Net 级联:该模型生成低分辨率分割,并随后对其进行优化。
这些架构中的每一个都有其独特的优势,并且不可避免地具有一定的局限性。
例如,使用2D U-Net进行3D图像分割似乎违反直觉,但在实践中,它仍然非常有效。这是通过将 3D 体积切成 2D 平面来实现的。
虽然3D U-Net可能看起来更复杂,但鉴于其更高的参数数量,它并不总是最有效的解决方案。特别是,3D U-Net经常与各向异性作斗争,当空间分辨率沿不同轴不同时(例如,沿x轴为1mm,沿z轴为1.2mm)时,就会发生这种情况。
U-Net Cascade变体在处理大图像尺寸时变得特别方便。它采用初步模型来压缩图像,然后是输出低分辨率分割的标准3D U-Net。然后对生成的预测进行放大,从而产生精细、全面的输出。

图片来自nnU-Net文章
通常,该方法涉及在nnU-Net框架内训练所有三个模型变体。接下来的步骤可能是选择三者中最好的表演者或采用合奏技术。其中一种技术可能涉及整合2D和3D U-Net的预测。
但是,值得注意的是,此过程可能非常耗时(而且需要金钱,因为您需要 GPU 积分)。如果您的约束只允许训练单个模型,请不要担心。您可以选择只训练一个模型,因为集成模型只带来非常微不足道的收益。
下表说明了与特定数据集相关的性能最佳的模型变体:

图片来自nnU-Net文章
3.1 网络拓扑的动态适应
鉴于图像大小的显着差异(考虑肝脏图像的中位数形状为482×512×512,而海马图像的中位数形状为36×50×35),nnU-Net智能地调整输入补丁大小和每个轴的池化操作次数。这实质上意味着自动调整每个数据集的卷积层数,从而促进空间信息的有效聚合。除了适应不同的图像几何形状外,该模型还考虑了技术限制,例如可用内存。
需要注意的是,该模型不会直接对整个图像执行分割,而是对具有重叠区域的精心提取的补丁执行分割。随后对这些补丁的预测进行平均,从而得出最终的分割输出。
但是拥有较大的补丁意味着更多的内存使用,并且批大小也会消耗内存。采取的权衡是始终优先考虑补丁大小(模型的容量)而不是批量大小(仅对优化有用)。
以下是用于计算最佳补丁大小和批大小的启发式算法:
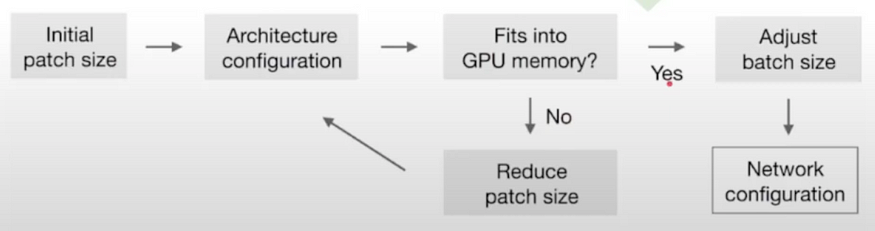
批次和补丁大小的启发式规则,图片来自nnU-Net文章
这是不同数据集和输入维度的样子:
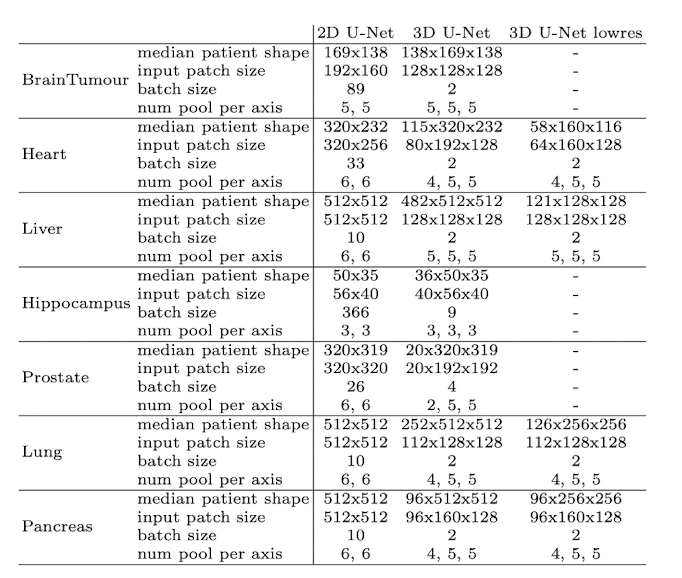
输入图像分辨率函数中的体系结构,图片来自nnU-Net文章
伟大!现在让我们快速回顾一下nnU-Net中使用的所有技术:
3.2 训练
所有模型都是从头开始训练的,并在训练集上使用五重交叉验证进行评估,这意味着原始训练数据集被随机分成五个相等的部分,或“折叠”。在此交叉验证过程中,其中四个折叠用于模型的训练,其余一个折叠用于评估或测试。然后重复此过程五次,五个折叠中的每一个都恰好用作评估集一次。
对于损失,我们使用骰子和交叉熵损失的组合。这是图像分割中非常常见的损失。有关V-Net中骰子损失的更多详细信息,U-Net大人物的兄弟
3.3 数据增强技术
nnU-Net有一个非常强大的数据增强管道。作者使用随机旋转、随机缩放、随机弹性变形、伽马校正和镜像。
注意:您可以通过修改源代码来添加自己的转换

弹性变形,来自本文

图片来自 OpenCV 库
3.4 基于补丁的推理
因此,正如我们所说,该模型不会直接在全分辨率图像上进行预测,而是在提取的补丁上进行预测,然后聚合预测。
这是它的样子:

基于补丁的推理,图片来源:作者
注意:图片中心的补丁比侧面的补丁具有更大的权重,因为它们包含更多信息并且模型在其上表现更好
3.5 成对模型集成

模型组合,图片由作者提供
因此,如果您记得不错,我们最多可以训练 3 种不同的模型,2D、3D 和级联。但是当我们进行推理时,我们一次只能使用一个模型,对吗?
事实证明,不,不同的模型有不同的优点和缺点。因此,我们实际上可以组合几个模型的预测,这样如果一个模型非常自信,我们就会优先考虑它的预测。
nnU-Net 测试了 2 个可用模型中 3 个模型的每个组合,并选择了最好的模型。
在实践中,有两种方法可以做到这一点:
硬投票: 对于每个像素,我们查看 2 个模型输出的所有概率,并选取概率最高的类。
软投票:对于每个像素,我们平均模型的概率,然后我们以最大概率取类。
四、实际实施
在我们开始之前,您可以在此处下载数据集并关注Google Collab笔记本。
如果你对第一部分一无所知,不用担心,这是实际的部分,你只需要跟着我,你还是会得到最好的结果。
您需要一个 GPU 来训练模型,否则它不起作用。您可以在本地或在Google Collab上进行,不要忘记更改GPU>运行时
因此,首先,您需要准备好一个包含输入图像及其相应分割的数据集。您可以按照我的教程下载这个用于 3D 大脑分割的现成数据集,然后您可以将其替换为您自己的数据集。
4.1 下载数据
首先,您应该下载数据并将其放置在数据文件夹中,方法是将包含分段的两个文件夹命名为“input”和“ground_truth”。
在本教程的其余部分,我将使用 MindBoggle 数据集进行图像分割。您可以在此Google云端硬盘上下载它:
我们得到了大脑的3D MRI扫描,我们希望分割白质和灰质:

图片来源:作者
它应该看起来像这样:

树,图片由作者提供
4.2 设置主目录
如果您在 Google Colab 上运行此操作,请将 collab = True,否则设置 collab = False
collab = Trueimport os
import shutil
#libraries
from collections import OrderedDict
import json
import numpy as np#visualization of the dataset
import matplotlib.pyplot as plt
import nibabel as nibif collab:from google.colab import drivedrive.flush_and_unmount()drive.mount('/content/drive', force_remount=True)# Change "neurosciences-segmentation" to the name of your project folderroot_dir = "/content/drive/MyDrive/neurosciences-segmentation"else:# get the dir of the parent dirroot_dir = os.getcwd()input_dir = os.path.join(root_dir, 'data/input')
segmentation_dir = os.path.join(root_dir, 'data/ground_truth')my_nnunet_dir = os.path.join(root_dir,'my_nnunet')
print(my_nnunet_dir)
现在我们将定义一个为我们创建文件夹的函数:
def make_if_dont_exist(folder_path,overwrite=False):"""creates a folder if it does not existsinput:folder_path : relative path of the folder which needs to be createdover_write :(default: False) if True overwrite the existing folder"""if os.path.exists(folder_path):if not overwrite:print(f'{folder_path} exists.')else:print(f"{folder_path} overwritten")shutil.rmtree(folder_path)os.makedirs(folder_path)else:os.makedirs(folder_path)print(f"{folder_path} created!")我们使用此功能来创建我们的“my_nnunet”文件夹,其中将保存所有内容
os.chdir(root_dir)
make_if_dont_exist('my_nnunet', overwrite=False)
os.chdir('my_nnunet')
print(f"Current working directory: {os.getcwd()}")
4.3 库安装
· 现在我们将安装所有要求。首先,让我们安装 nnunet 库。如果您在笔记本中,请在单元格中运行以下命令:
!pip install nnunet否则,您可以直接从终端安装 nnunet
pip install nnunet现在我们要克隆nnUnet git存储库和NVIDIA apex。它包含训练脚本以及 GPU 加速器。
!git clone https://github.com/MIC-DKFZ/nnUNet.git
!git clone https://github.com/NVIDIA/apex# repository dir is the path of the github folder
respository_dir = os.path.join(my_nnunet_dir,'nnUNet')
os.chdir(respository_dir)
!pip install -e
!pip install --upgrade git+https://github.com/nanohanno/hiddenlayer.git@bugfix/get_trace_graph#egg=hiddenlayer
4.4 文件夹的创建
nnUnet 需要文件夹的非常具体的结构。
task_name = 'Task001' #change here for different task name# We define all the necessary paths
nnunet_dir = "nnUNet/nnunet/nnUNet_raw_data_base/nnUNet_raw_data"
task_folder_name = os.path.join(nnunet_dir,task_name)
train_image_dir = os.path.join(task_folder_name,'imagesTr') # path to training images
train_label_dir = os.path.join(task_folder_name,'labelsTr') # path to training labels
test_dir = os.path.join(task_folder_name,'imagesTs') # path to test images
main_dir = os.path.join(my_nnunet_dir,'nnUNet/nnunet') # path to main directory
trained_model_dir = os.path.join(main_dir, 'nnUNet_trained_models') # path to trained models
最初,nnU-Net是为具有不同任务的十项全能挑战而设计的。如果您有不同的任务,只需为所有任务运行此单元格。
# Creation of all the folders
overwrite = False # Set this to True if you want to overwrite the folders
make_if_dont_exist(task_folder_name,overwrite = overwrite)
make_if_dont_exist(train_image_dir, overwrite = overwrite)
make_if_dont_exist(train_label_dir, overwrite = overwrite)
make_if_dont_exist(test_dir,overwrite= overwrite)
make_if_dont_exist(trained_model_dir, overwrite=overwrite)
你现在应该有一个这样的结构:

图片来源:作者
4.5 设置环境变量
脚本需要知道您raw_data放在哪里,在哪里可以找到预处理的数据,以及必须保存结果的位置。
os.environ['nnUNet_raw_data_base'] = os.path.join(main_dir,'nnUNet_raw_data_base')
os.environ['nnUNet_preprocessed'] = os.path.join(main_dir,'preprocessed')
os.environ['RESULTS_FOLDER'] = trained_model_dir
4.6 将文件移动到正确的存储库中:
我们定义了一个函数,它将我们的图像移动到 nnunet 文件夹中的正确存储库:
def copy_and_rename(old_location,old_file_name,new_location,new_filename,delete_original = False):shutil.copy(os.path.join(old_location,old_file_name),new_location)os.rename(os.path.join(new_location,old_file_name),os.path.join(new_location,new_filename))if delete_original:os.remove(os.path.join(old_location,old_file_name))现在让我们对输入和真实图像运行此函数:
list_of_all_files = os.listdir(segmentation_dir)
list_of_all_files = [file_name for file_name in list_of_all_files if file_name.endswith('.nii.gz')]for file_name in list_of_all_files:copy_and_rename(input_dir,file_name,train_image_dir,file_name)copy_and_rename(segmentation_dir,file_name,train_label_dir,file_name)
现在我们必须重命名文件以接受nnUnet格式,例如subject.nii.gz将成为subject_0000.nii.gz
def check_modality(filename):"""check for the existence of modalityreturn False if modality is not found else True"""end = filename.find('.nii.gz')modality = filename[end-4:end]for mod in modality:if not(ord(mod)>=48 and ord(mod)<=57): #if not in 0 to 9 digitsreturn Falsereturn Truedef rename_for_single_modality(directory):for file in os.listdir(directory):if check_modality(file)==False:new_name = file[:file.find('.nii.gz')]+"_0000.nii.gz"os.rename(os.path.join(directory,file),os.path.join(directory,new_name))print(f"Renamed to {new_name}")else:print(f"Modality present: {file}")rename_for_single_modality(train_image_dir)
# rename_for_single_modality(test_dir)
4.7 设置 JSON 文件
我们快完成了!您主要需要修改两件事:
- 模态(如果是 CT 或 MRI,这会改变标准化)
- 标签:输入您自己的类别
overwrite_json_file = True #make it True if you want to overwrite the dataset.json file in Task_folder
json_file_exist = Falseif os.path.exists(os.path.join(task_folder_name,'dataset.json')):print('dataset.json already exist!')json_file_exist = Trueif json_file_exist==False or overwrite_json_file:json_dict = OrderedDict()json_dict['name'] = task_namejson_dict['description'] = "Segmentation of T1 Scans from MindBoggle"json_dict['tensorImageSize'] = "3D"json_dict['reference'] = "see challenge website"json_dict['licence'] = "see challenge website"json_dict['release'] = "0.0"######################## MODIFY THIS #########################you may mention more than one modalityjson_dict['modality'] = {"0": "MRI"}#labels+1 should be mentioned for all the labels in the datasetjson_dict['labels'] = {"0": "Non Brain","1": "Cortical gray matter","2": "Cortical White matter","3" : "Cerebellum gray ","4" : "Cerebellum white"}#############################################################train_ids = os.listdir(train_label_dir)test_ids = os.listdir(test_dir)json_dict['numTraining'] = len(train_ids)json_dict['numTest'] = len(test_ids)#no modality in train image and labels in dataset.jsonjson_dict['training'] = [{'image': "./imagesTr/%s" % i, "label": "./labelsTr/%s" % i} for i in train_ids]#removing the modality from test image name to be saved in dataset.jsonjson_dict['test'] = ["./imagesTs/%s" % (i[:i.find("_0000")]+'.nii.gz') for i in test_ids]with open(os.path.join(task_folder_name,"dataset.json"), 'w') as f:json.dump(json_dict, f, indent=4, sort_keys=True)if os.path.exists(os.path.join(task_folder_name,'dataset.json')):if json_file_exist==False:print('dataset.json created!')else:print('dataset.json overwritten!')
4.8 预处理 nnU-Net 格式的数据
这将为 nnU-Net 格式创建数据集
# -t 1 means "Task001", if you have a different task change it
!nnUNet_plan_and_preprocess -t 1 --verify_dataset_integrity
4.9 训练模型
我们现在已准备好训练模型!
要训练 3D U-Net,请执行以下操作:
#train 3D full resolution U net
!nnUNet_train 3d_fullres nnUNetTrainerV2 1 0 --npz
要训练 2D U-Net,请执行以下操作:
# train 2D U net
!nnUNet_train 2d nnUNetTrainerV2 1 0 --npz
训练级联模型:
# train 3D U-net cascade
!nnUNet_train 3d_lowres nnUNetTrainerV2CascadeFullRes 1 0 --npz
!nnUNet_train 3d_fullres nnUNetTrainerV2CascadeFullRes 1 0 --npz
注意:如果您暂停编辑并想要恢复它,请在末尾添加“-c”以表示“继续”。
例如:
#train 3D full resolution U net
!nnUNet_train 3d_fullres nnUNetTrainerV2 1 0 --npz
4.10 推理
现在我们可以运行推理:
result_dir = os.path.join(task_folder_name, 'nnUNet_Prediction_Results')
make_if_dont_exist(result_dir, overwrite=True)# -i is the input folder
# -o is where you want to save the predictions
# -t 1 means task 1, change it if you have a different task number
# Use -m 2d, or -m 3d_fullres, or -m 3d_cascade_fullres
!nnUNet_predict -i /content/drive/MyDrive/neurosciences-segmentation/my_nnunet/nnUNet/nnunet/nnUNet_raw_data_base/nnUNet_raw_data/Task001/imagesTs -o /content/drive/MyDrive/neurosciences-segmentation/my_nnunet/nnUNet/nnunet/nnUNet_raw_data_base/nnUNet_raw_data/Task001/nnUNet_Prediction_Results -t 1 -tr nnUNetTrainerV2 -m 2d -f 0  --num_threads_preprocessing 1
五、预测的可视化
首先,让我们检查一下训练损失。这看起来非常健康,我们的骰子分数> 0.9(绿色曲线)。
这对于如此少的工作和3D神经影像分割任务来说确实非常出色。
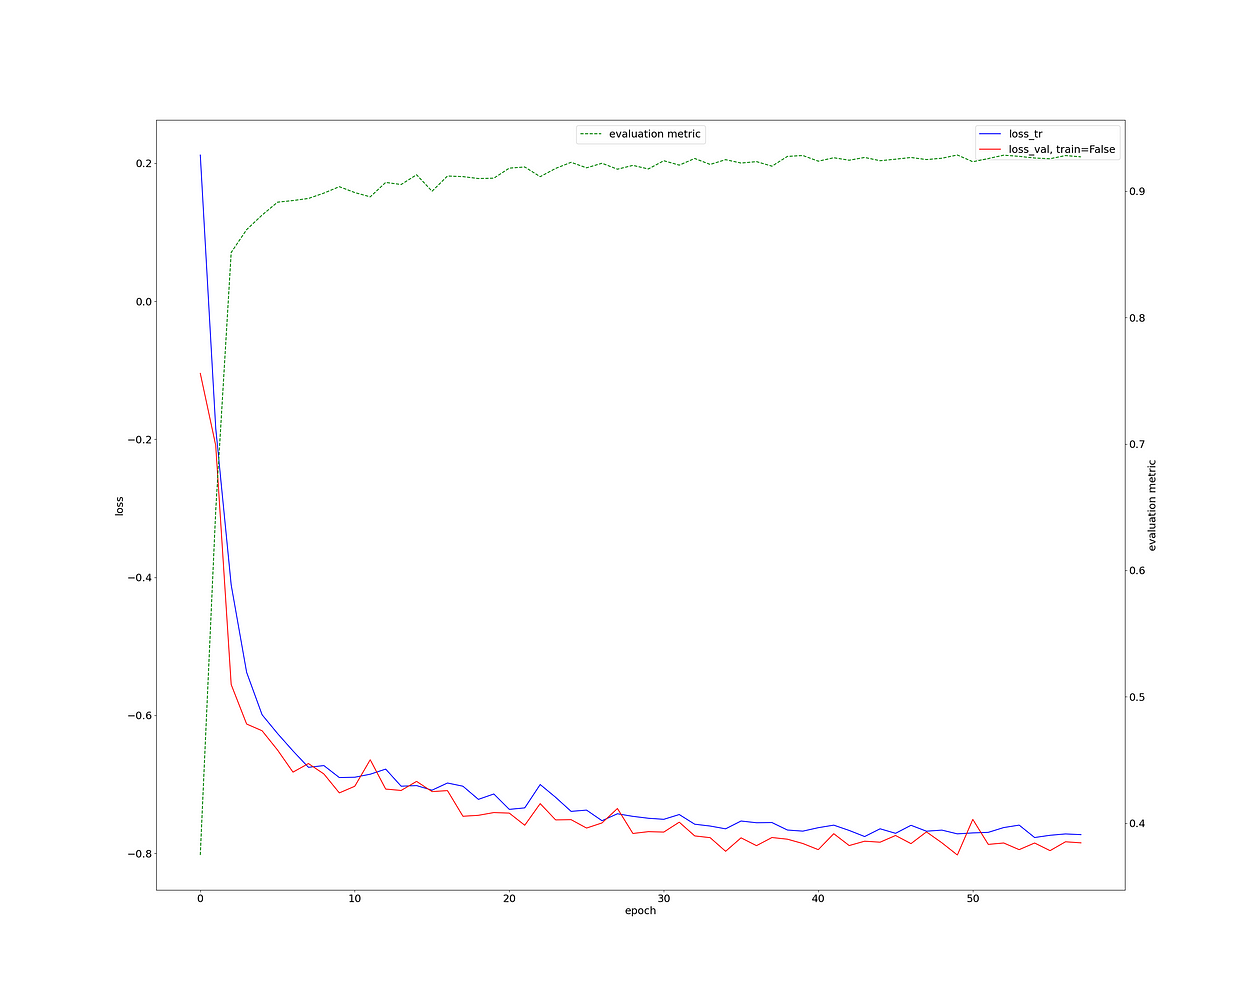
训练损失、测试损失、验证骰子、作者图片
让我们看一个示例:
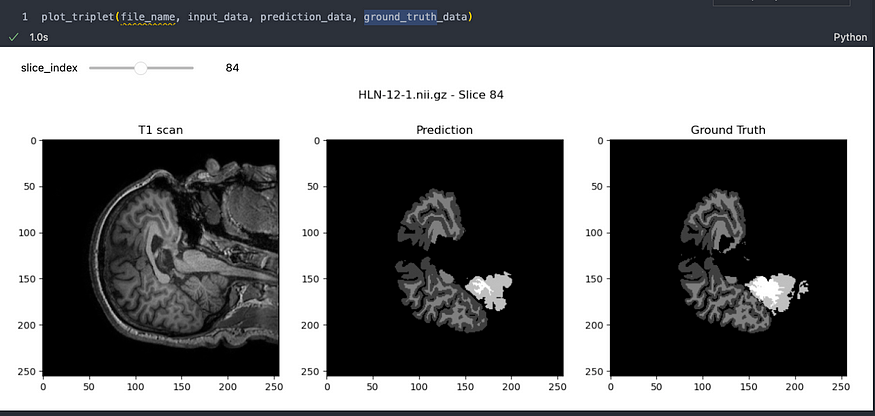
对MindBoggle数据集的预测,图片由作者提供
结果确实令人印象深刻!很明显,该模型已经有效地学会了如何高精度地分割大脑图像。虽然可能存在一些小瑕疵,但重要的是要记住,图像分割领域正在迅速发展,我们正在朝着完美迈出重大步伐。
将来,还有进一步优化nnU-Net性能的空间,但这将是另一篇文章。
如果你觉得这篇文章很有见地和好处,请考虑关注我,对深度学习的世界进行更深入的探索。您的支持帮助我继续制作有助于我们集体理解的内容。
无论您是有反馈,想法要分享,想与我合作,还是只是想打个招呼,请填写下面的表格,让我们开始对话。
打招呼 🌿
不要犹豫,留下鼓掌或关注我更多!
六、引用
- Ronneberger,O.,Fischer,P.和Brox,T.(2015)。U-net:用于生物医学图像分割的卷积网络。医学图像计算和计算机辅助干预国际会议(第234-241页)。斯普林格,湛。
- Isensee, F., Jaeger, P. F., Kohl, S. A., Petersen, J., & Maier-Hein, K. H. (2021).nnU-Net:一种基于深度学习的生物医学图像分割的自配置方法。自然方法,18(2),203-211。
- Ioffe, S., & Szegedy, C. (2015).批量规范化:通过减少内部协变量偏移来加速深度网络训练。arXiv预印本arXiv:1502.03167。
- Ulyanov,D.,Vedaldi,A.和Lempitsky,V.(2016)。实例规范化:快速风格化的缺失要素。arXiv预印本arXiv:1607.08022。
- MindBoggle 数据集
弗朗索瓦·波彻