网站评论回复如何做实时热榜
UE4直接在项目设置里设置的轴映射和操作映射在UE5中被标记为废弃,改为使用增强输入系统。
这两天学习了下蓝图和c++中增强输入系统的使用,在这里分享一下。
学习使用的模板是第三人称模板(蓝图/c++),代码蓝图都参考的模板。
增强输入系统
UE5中加入的用来处理输入的系统。
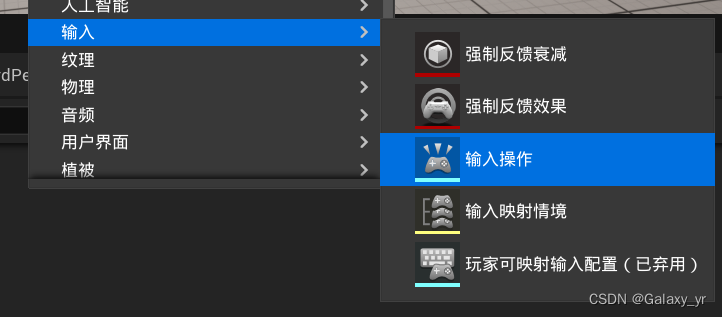
分为两部分,分别是输入操作和输入映射情境。在虚幻编辑器中通过右键添加->输入->输入操作/输入映射情境来创建。
输入操作 InputAction
顾名思义,用来绑定特定的操作,例如键盘、鼠标、手柄的某个按键。
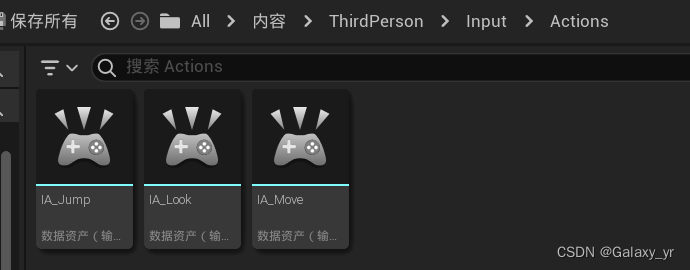
在ThirdPerson/Blueprints/Input/Actions目录下,可以看到模板自带的几个输入操作
我们双击点开IA_Move查看细节
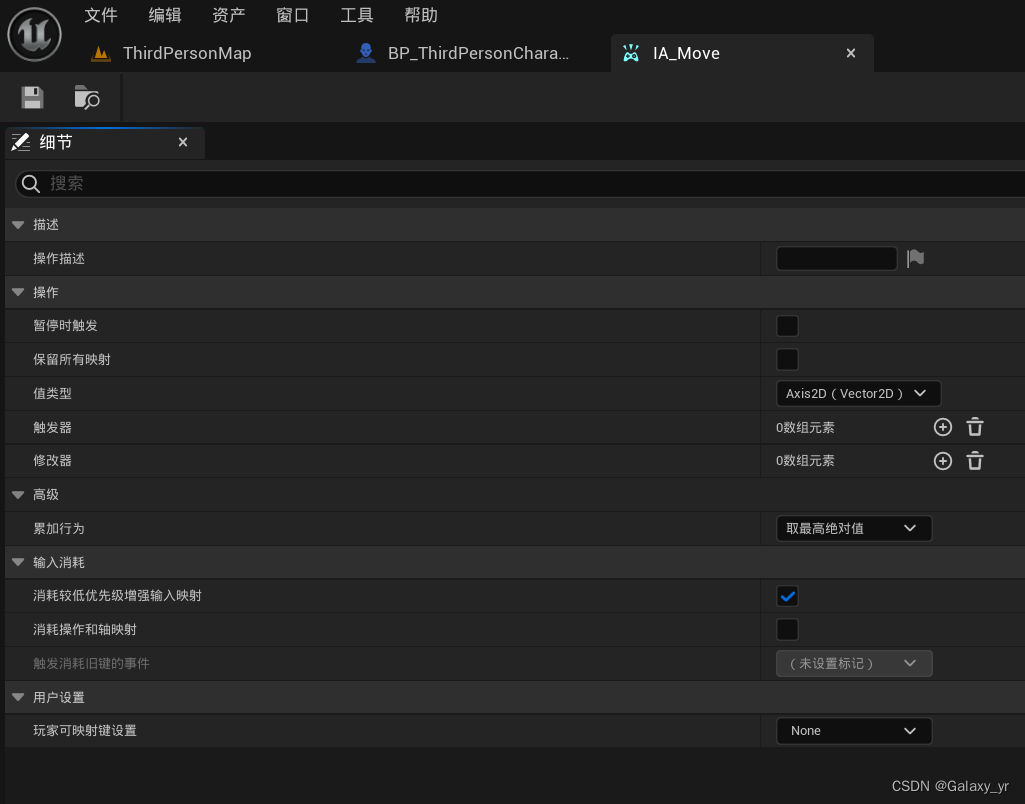
看到值类型为Axis2D,这个值类型是用来设置输入的值的,因为移动是一个X,Y轴上的二维操作,所以我们选择Axis2D,如果是跳跃的话,则使用数字(布尔)。
模板通过创建输入操作成功绑定了几种输入操作,分别是观察、跳跃和移动,接下来我们将在输入映射情境中为输入操作绑定按键和设置。
输入映射情境 InputMappingContext
用来给输入操作绑定具体的按键和一些处理的资产。
在ThirdPerson/Blueprints/Input中,已经有一个IMC_Default的输入映射情境,可以打开看一下怎么使用。
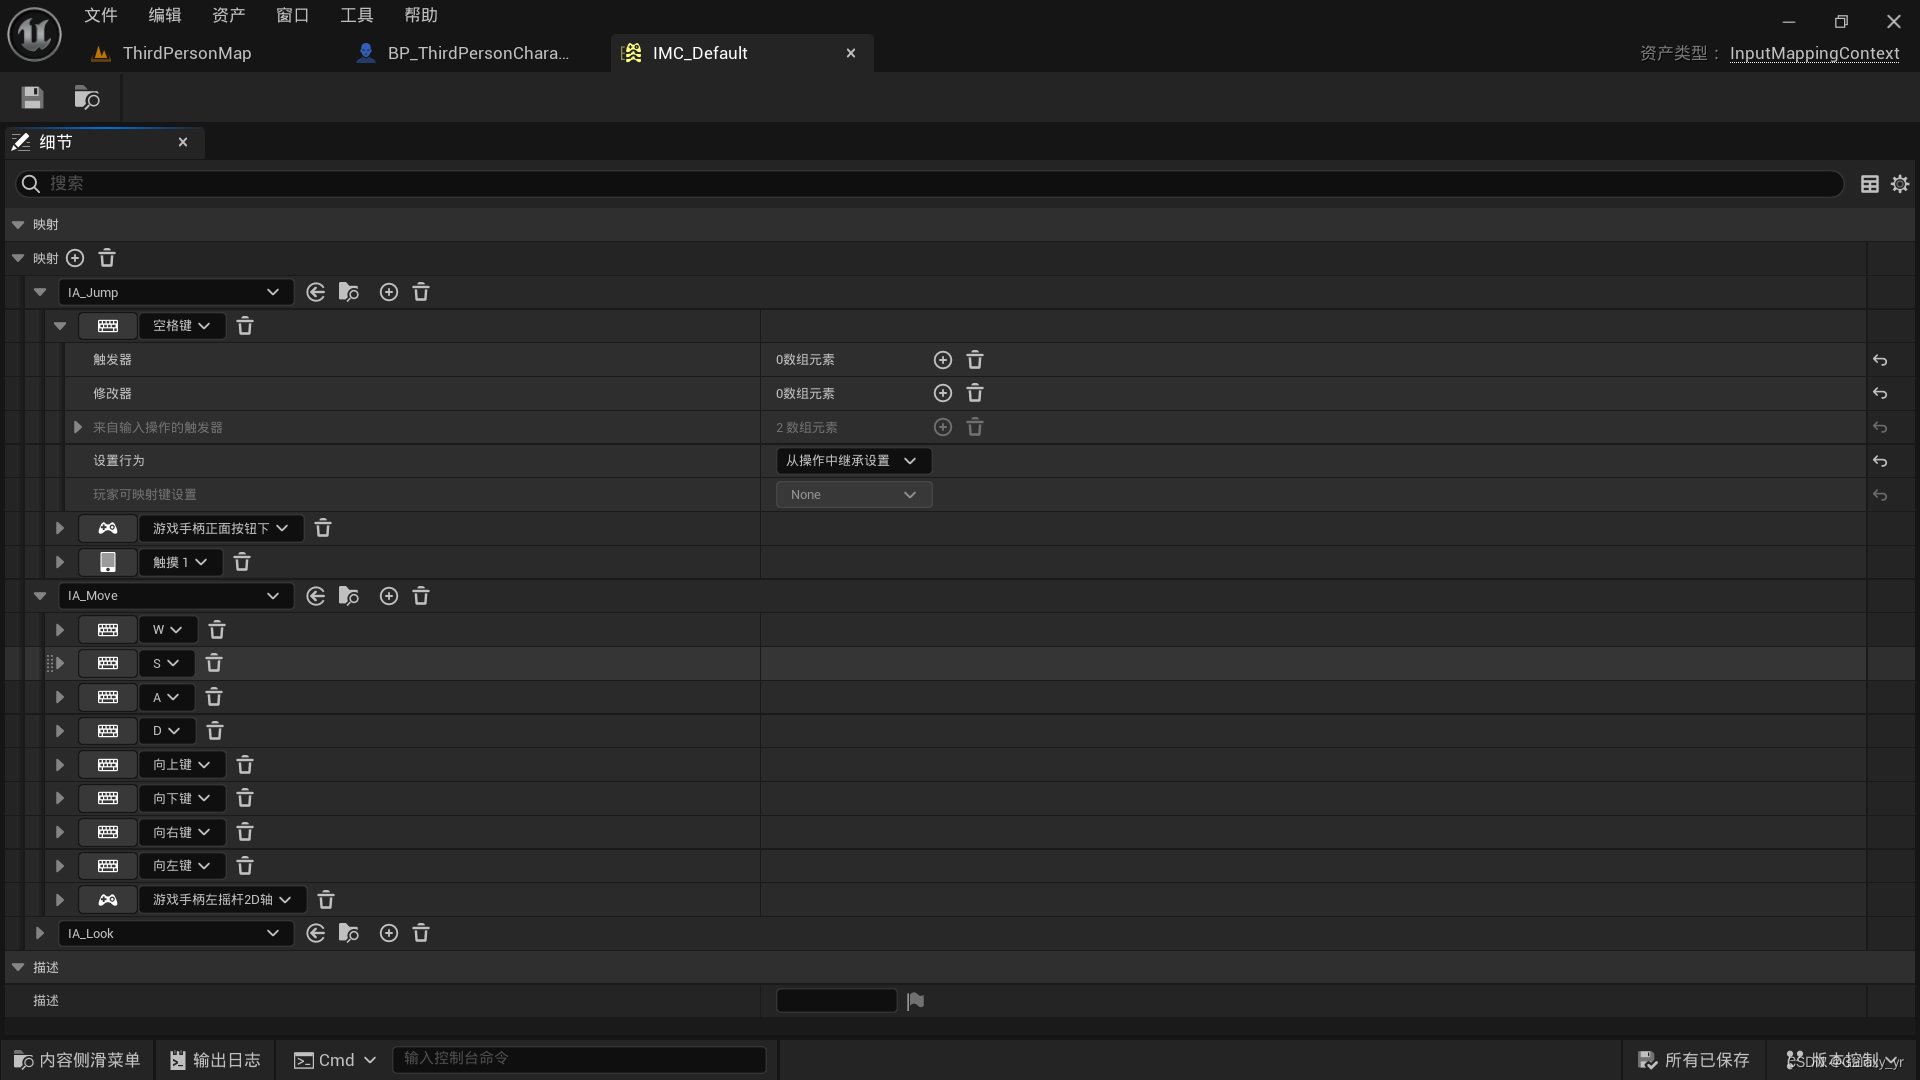
通过映射旁边的加号可以添加操作映射,新建后首先选择我们的一个输入操作,例如第一个的IA_Jump,之后点击旁边的加号为IA_Jump操作进行控制绑定。可以看到这里为IA_Jump跳跃绑定了键盘空格、手柄正面按钮下和触摸1。IA_Move移动绑定了键盘WASD,上下左右键和手柄左摇杆2D轴。
点开每个按键的下三角,可以看到可以配置触发器和修改器,用于在按下后进行一个设置。由于跳跃比较简单,所以没有触发器和修改器。我们看看WS按键的相关设置
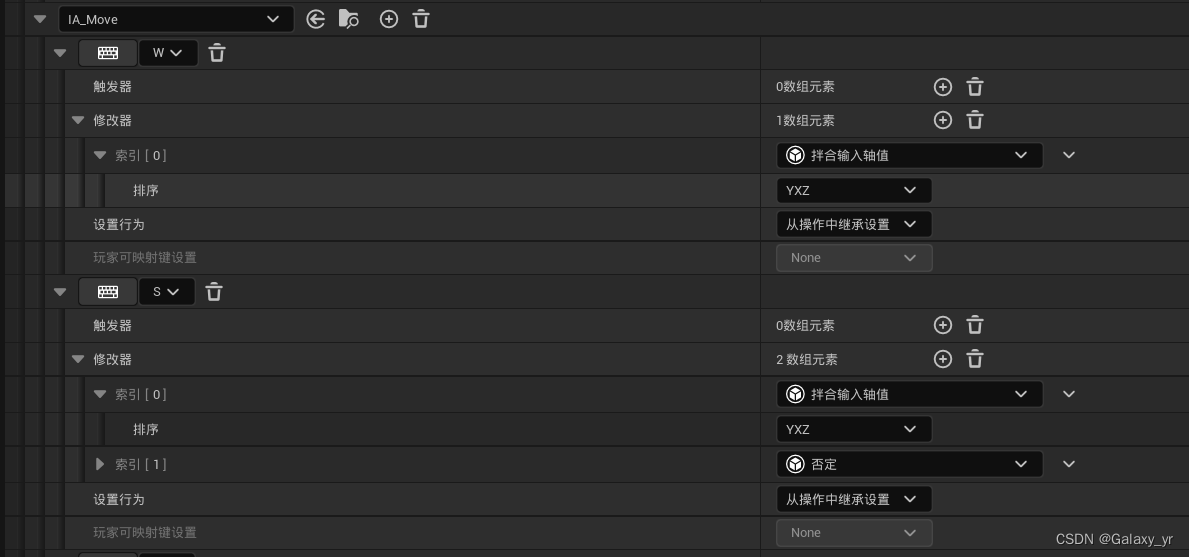
W键在修改器中添加了一个拌合输入轴值,这个是用例交换X、Y轴的,如果不设置这个,默认是X轴的移动,也就是向右走。
S键在W键的基础上设置了一个否定,也就是去负值,表示向后走。
其他按键可自行查看。
使用
现在我们有了输入操作和输入映射情境后就已经做好了一套输入映射,例如WASD移动、空格跳跃等,接下来我们要在蓝图和C++中使用我们做好的绑定。
蓝图中
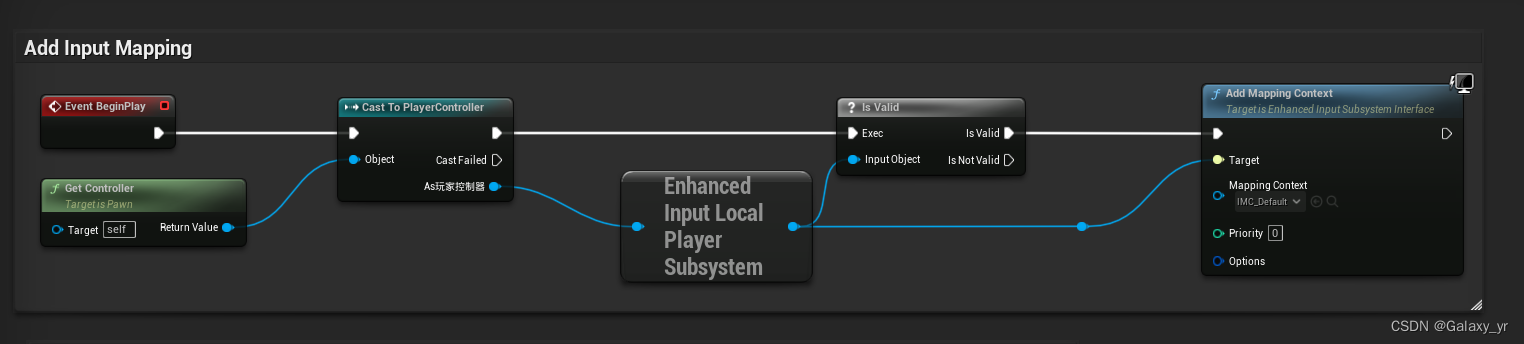
我们查看/content/ThirdPerson/Blueprints/BP_ThirdPersonCharacter的事件图表,在最上面首先绑定了输入映射情境
之后对每个输入映射都进行了相应的处理,我们先看移动输入
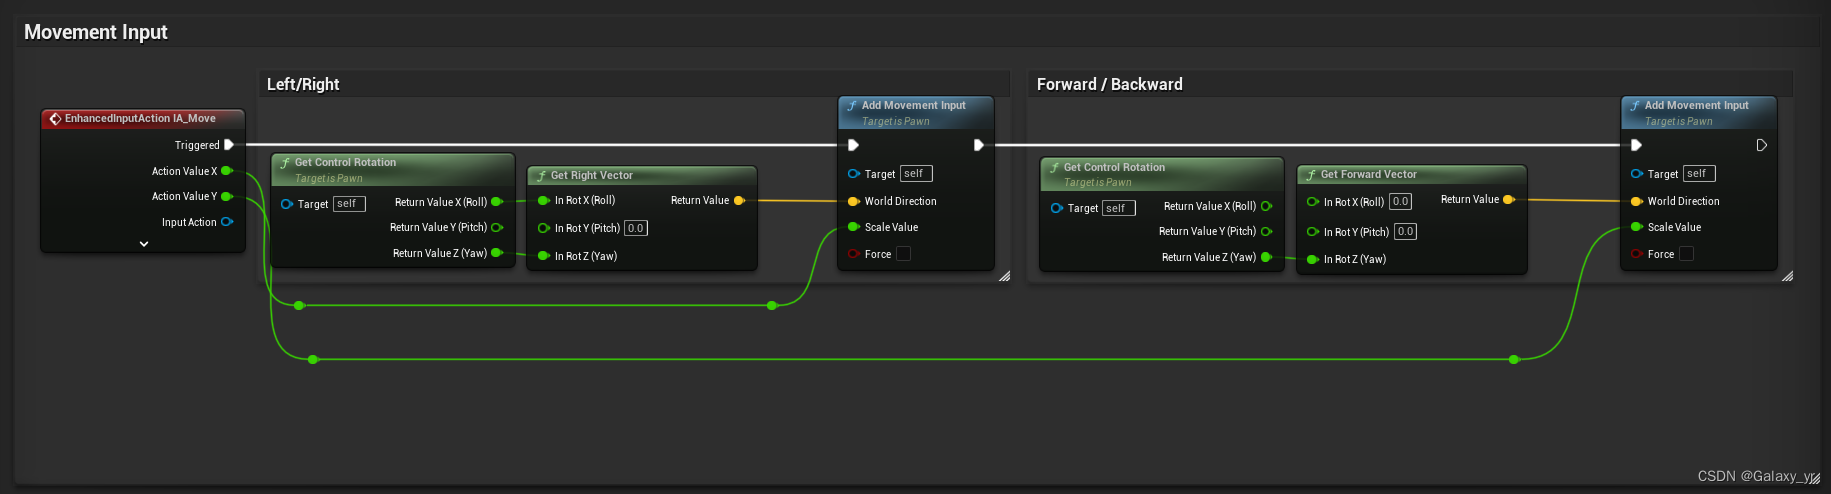
这里IA_Move的ActionValue是一个二维向量,因为在IA_Move里设置的值类型为Axis2D,X轴表示左右移动,Y轴表示前后移动,这里具体的值取决于我们是键盘还是手柄,键盘是话应该就是1,手柄则是根据左摇杆划的程度来获得一个0~1的值。选择Triggered来连线表示持续触发。如果是跳跃操作,应该选择Started,可自行查看。
如此我们就在蓝图中完成了使用增强输入系统。
c++
c++中我们的角色基类为项目名+Character.h,以下为源代码
// Copyright Epic Games, Inc. All Rights Reserved.#pragma once#include "CoreMinimal.h"
#include "GameFramework/Character.h"
#include "Logging/LogMacros.h"
#include "ThirdPersonCppDemoCharacter.generated.h"class USpringArmComponent;
class UCameraComponent;
class UInputMappingContext;
class UInputAction;
struct FInputActionValue;DECLARE_LOG_CATEGORY_EXTERN(LogTemplateCharacter, Log, All);UCLASS(config=Game)
class AThirdPersonCppDemoCharacter : public ACharacter
{GENERATED_BODY()/** Camera boom positioning the camera behind the character */UPROPERTY(VisibleAnywhere, BlueprintReadOnly, Category = Camera, meta = (AllowPrivateAccess = "true"))USpringArmComponent* CameraBoom;/** Follow camera */UPROPERTY(VisibleAnywhere, BlueprintReadOnly, Category = Camera, meta = (AllowPrivateAccess = "true"))UCameraComponent* FollowCamera;/** MappingContext */UPROPERTY(EditAnywhere, BlueprintReadOnly, Category = Input, meta = (AllowPrivateAccess = "true"))UInputMappingContext* DefaultMappingContext;/** Jump Input Action */UPROPERTY(EditAnywhere, BlueprintReadOnly, Category = Input, meta = (AllowPrivateAccess = "true"))UInputAction* JumpAction;/** Move Input Action */UPROPERTY(EditAnywhere, BlueprintReadOnly, Category = Input, meta = (AllowPrivateAccess = "true"))UInputAction* MoveAction;/** Look Input Action */UPROPERTY(EditAnywhere, BlueprintReadOnly, Category = Input, meta = (AllowPrivateAccess = "true"))UInputAction* LookAction;public:AThirdPersonCppDemoCharacter();protected:/** Called for movement input */void Move(const FInputActionValue& Value);/** Called for looking input */void Look(const FInputActionValue& Value);protected:// APawn interfacevirtual void SetupPlayerInputComponent(class UInputComponent* PlayerInputComponent) override;// To add mapping contextvirtual void BeginPlay();public:/** Returns CameraBoom subobject **/FORCEINLINE class USpringArmComponent* GetCameraBoom() const { return CameraBoom; }/** Returns FollowCamera subobject **/FORCEINLINE class UCameraComponent* GetFollowCamera() const { return FollowCamera; }};可以看到,这里创建了几个UInputAction类对象,对应的就是输入操作。UInputMappingContext* DefaultMappingContext;对应的是输入映射情境,我们设置为蓝图可编辑,之后派生出蓝图类后在类默认值那里可以设置。在BeginPlay函数中,把DefaultMappingContext给了增强输入系统。
if (APlayerController* PlayerController = Cast<APlayerController>(Controller)){if (UEnhancedInputLocalPlayerSubsystem* Subsystem = ULocalPlayer::GetSubsystem<UEnhancedInputLocalPlayerSubsystem>(PlayerController->GetLocalPlayer())){Subsystem->AddMappingContext(DefaultMappingContext, 0);}}virtual void SetupPlayerInputComponent(class UInputComponent* PlayerInputComponent) override;为APawn的接口,我们需要实现它,它就是用来设置按键按下后的反应。此为模板为跳跃、移动和观察实现的该函数。
void AThirdPersonCppDemoCharacter::SetupPlayerInputComponent(UInputComponent* PlayerInputComponent)
{// Set up action bindingsif (UEnhancedInputComponent* EnhancedInputComponent = Cast<UEnhancedInputComponent>(PlayerInputComponent)) {// JumpingEnhancedInputComponent->BindAction(JumpAction, ETriggerEvent::Started, this, &ACharacter::Jump);EnhancedInputComponent->BindAction(JumpAction, ETriggerEvent::Completed, this, &ACharacter::StopJumping);// MovingEnhancedInputComponent->BindAction(MoveAction, ETriggerEvent::Triggered, this, &AThirdPersonCppDemoCharacter::Move);// LookingEnhancedInputComponent->BindAction(LookAction, ETriggerEvent::Triggered, this, &AThirdPersonCppDemoCharacter::Look);}else{UE_LOG(LogTemplateCharacter, Error, TEXT("'%s' Failed to find an Enhanced Input component! This template is built to use the Enhanced Input system. If you intend to use the legacy system, then you will need to update this C++ file."), *GetNameSafe(this));}
}
上面代码段中的Move、Look函数为模板实现的函数